
How I Built a 2025-Ready ZX Spectrum Keyboard Case Without a 3D Printer (PCBWay to the Rescue)
There’s a special kind of retro tragedy that happens when you’re ready to print, paint, and perfect your next ZX project… and then your 3D printer doesn’t survive the move. I hit that exact wall recently—right before retro stuff became the plan—so I had to ask myself: can I still build a brand-new Spectrum-style case in 2025 without doing the “3D printer hobbyist” thing? Turns out, yes… and it involved a sponsor, a material choice, and a level of paperwork I didn’t know existed. Also: I may have invented a packing-foam soldering jig. Let’s rewind and walk through exactly what I did.
Why I Didn’t Have a 3D Printer (And Why That Mattered)
I went to the cave and RetroFest recently and picked up a couple of gifted items—one being a Harley Quinn 128 that was already built, and another a Meturm keyboard. They didn’t arrive together, but I could see the match: combine the board and keyboard with some proper case work, plus—at least in theory—a big tub of keycaps.
I’d seen other YouTubers build these setups, and I was fairly sure they’d printed their own cases. I thought, “Great—I’ve got a 3D printer.” Then reality tapped me on the shoulder and reminded me that my printer had effectively been left “a rot” after moving. So the odds of getting it back up and printing at the quality I wanted? Pretty slim.
The Plan B: Outsource the Printing (PCBWay)
My alternative was to lean on my sponsor, PCBWay, which offers 3D printing services. The best part for me wasn’t just that they print—it was that I could choose materials and colors, and they’d even finish the parts.
For a keyboard case, I wasn’t going for fragile “display-only” plastic. I wanted something robust—something that could survive the modern world and my inevitable clumsiness.
Material Choice: PETG for the Main Case
I browsed their catalog and landed on PETG. In the video, I described it as a robust plastic that would be “almost indestructible by modern day standards,” and I also liked the idea of it adding some weight. I noted it’s denser than ABS, which—while I didn’t measure it scientifically—felt like it would give the case that satisfying heft retro machines deserve.
For the rest of the case build, I also planned a slightly different approach: I wanted a smoother finish on one component.
Downloading the Models (Printables → PCBWay)
The workflow started on the Printables website. I downloaded the relevant 3D models, which came as a zip file.
Then I switched to PCBWay and went to their 3D printing section:
- Uncompressed the Printables zip file
- Selected the appropriate options (the “right IO” for the use case)
- Dragged and dropped the model files into PCBWay
PCBWay generated a huge list of components. At that point, I just had to specify things like:
- Quantities
- Material type
- Optional changes like color
In my instance, I set one part to green. For the main structure, I chose black for the base components.
One “Upgrade”: Resin for a Smoother Back Panel
The only part I treated differently was the back panel. I ordered it as a resin print so it would come out smoother. I also called out the color choice: I went for a “black gray” look.
Before paying, I used the 3D model viewer to sanity-check that everything looked right. That step felt important—because nothing is more annoying than realizing you ordered the wrong thing after the plastic has already been shipped across the universe.
Was It Cheaper Than Buying My Own Printer?
I had to ask the obvious question: would this be economical compared to buying a capable printer?
My answer in the video was basically: it depends, but for me—since I’m doing multiple parts and using two materials—outsourcing made sense. Even a printer capable of doing this well would be significantly more expensive.
And honestly, when your own printer is temporarily “gone,” the economics get even simpler.
The Parts Arrived: Hefty, Clean, and Very “Retro Bed-Side”
When the printed parts arrived, I was immediately happy. They were fairly hefty, and the print quality was lovely.
I also mentioned a detail I really liked: a “glittery textured effect” on the surfaces that had been in contact with the bed. It’s the kind of aesthetic that reminds me of classic retro hardware styling—like the case itself is saying, “Yes, I’m made for tinkering.”
And the dimensions and fit were really good, which I credited more to Lee Smith’s models than to PCBWay alone. That’s an important nuance: great prints still won’t save sloppy designs.
Assembly Time: Flex Leads, Stabilizers, and Switch Soldering
Next came the fun part: assembling everything into something that resembles a Spectrum.
First, I attached the flexi leads that connect to the Spectrum. I made sure to solder the ends in the correct orientation—because flipping a connector once is an experience, but doing it twice becomes a hobby.
Installing the Keyboard Stabilizers
I installed the little stabilizers—one for the space bar and one for the longer shift key.
My approach was:
- Lay down small pads to protect the PCB
- Install the control bars over the top
- Let them screw in from the underside
Soldering the Keyboard Switches (My Packing-Foam Trick)
When it came to soldering in the keyboard switches, I used an “slightly oddball technique”: I used a piece of packing foam to secure the keys while I soldered everything with the keyboard flipped over.
I was surprised it worked really well—so much so that I said it might even be something I’d recommend. Sometimes the best engineering is just “whatever prevents the tiny parts from moving.”
Keycaps: A Deliberate Mismatch That Somehow Works
Once the electronics were in place, I populated the keyboard.
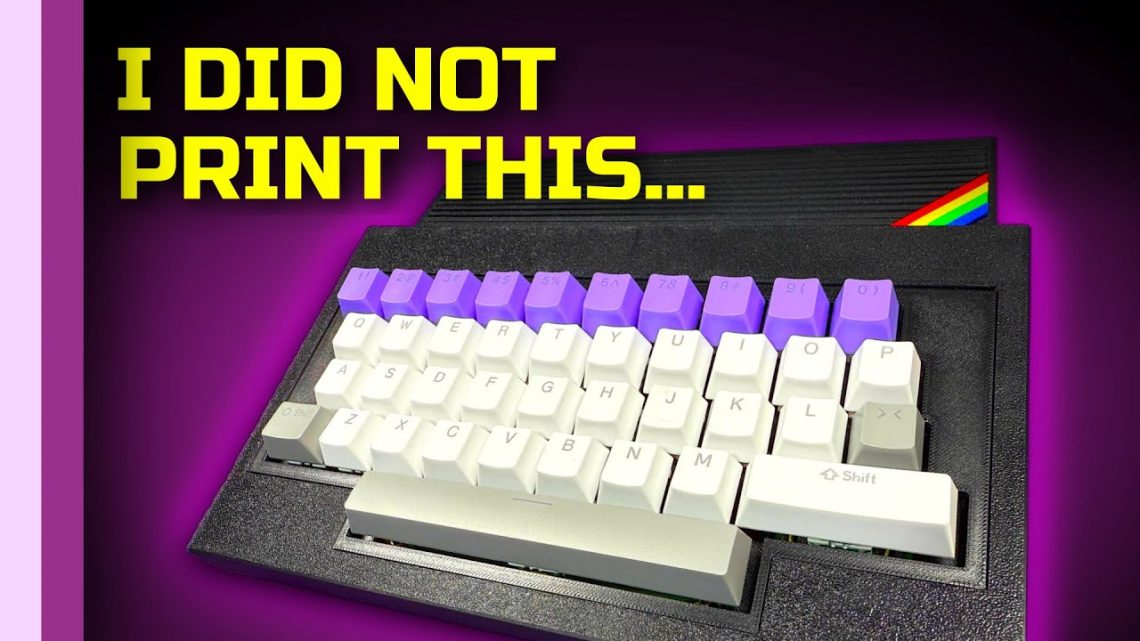
I chose a mismatched set of keycaps from multiple collections, because I had a fun idea: a purple number section. The rest was a white main keyboard with gray accents for the space bar, shift, and enter.
I’ll be honest: I didn’t know how “right” it would feel until it was assembled. But the result looked good and gave it personality—like a Spectrum that went to a retro aesthetic school.
Putting It Together: Harley Quinn 128 Goes In (Testing Later)
I also noted that I was assured the Harley Quinn 128 board works perfectly. In the video, I said I’d test it “at some future date,” but that wasn’t the main point of this episode.
So I glossed over deep verification and focused on the build.
One practical issue: I didn’t have the 9V power supply on hand. I said I’d sort that in a future video, especially since this isn’t the only Spectrum I’d received and I wanted to do a dedicated deeper dive into it.
The Final Result: A Spectrum-Like Case With a Nod or Two
Once everything was assembled, the case looked great. I described it as aesthetically pleasing, with some nods to the A600.
Then I went full speculative retro-nerd and said: “This is what Sinclair would have made if they made the Omega, I guess.” Who knows? But I like that energy—because retro computing isn’t just functionality, it’s imagined timelines.
And yes: having a mechanical keyboard on a Spectrum 128 is genuinely nice. I also pointed out a playful homage to Lee’s recent keyboard build for the ZX81: I put the space bar upside down, to see if anyone noticed. The kind of easter egg that only the builder truly laughs at—until you do, and then it’s a team sport.
My Takeaway: Don’t Let Missing Hardware Stop the Build
The biggest lesson for me was simple: when your original plan collapses—like my 3D printer after moving—you don’t have to cancel the project. You can still keep momentum by outsourcing the part that’s blocking you.
In my case, PCBWay let me build a robust, well-fitting case without owning a working printer. And honestly? The result looks like it belongs in 2025 and still feels like it’s wearing a CRT glow filter.
Now I just need that 9V power supply… and then we’ll find out if everything I assembled is as good as it looks.

