JuiceBox: From Purple PCB to an Upgraded Power Supply (Amiga USB-C Power, Revision 2)
There’s a special kind of nostalgia that kicks in when you’re powering an old computer with modern bits. It’s half engineering, half archaeology—like digging up a treasure chest but realizing it’s full of capacitors and optimism. In my JuiceBox series, I set out to make a compact, USB-C-powered supply for an Amiga—starting with a purple PCB in an orange case, then pushing it through real-world use, teardown nerves, and finally an upgrade to make everything tidier (and calmer) in revision 2.
Chapter 1: The Orange Case Dream (and the Purple PCB that Made It Happen)
Before the JuiceBox had a name and a case, I’d already been experimenting with powering an Amiga using USB-C. One of my early attempts was a “little contraption” that used a USB-C PD to 12V approach connected to a Pico ATX power supply with its connector removed and wired directly to the Amiga. It worked well, but it was a bit… chunky. Vintage computers deserve charm, sure, but my bench definitely doesn’t need more bulky bricks.
Then my bench power supply finally let out the magic smoke. (A dramatic exit. Very on-brand for electronics, honestly.) That failure pushed this project off the back burner and straight into my “fine, we’re doing it now” era.
My original motivation was practical: I wanted something fit for purpose for Matt from Retro Sega Dev, specifically for his Amiga 500 Plus that I’d resurrected from the dead. I initially considered using my internal ATX power delivery combo, but the closer I looked, the more I started worrying about heat and airflow with that approach.
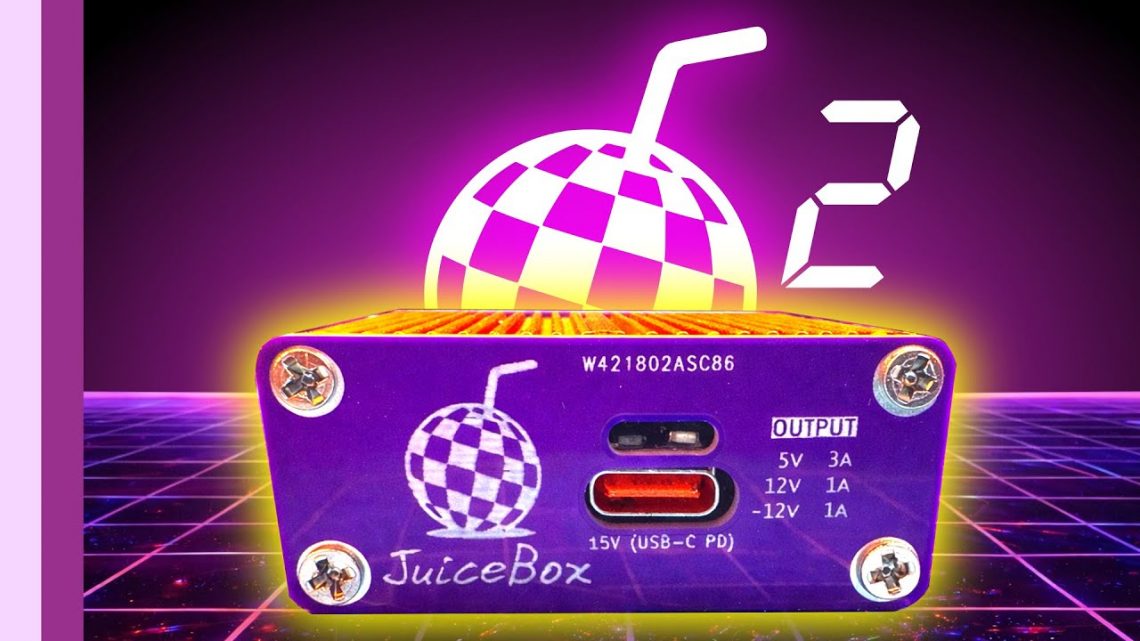
So I moved back toward an external power supply style—starting from an older “black box” design—but aimed to do an iteration that was smaller and had a better thermal design. The result: an extremely small aluminum extrusion case in a rather fetching orange. (Yes, it’s a departure from my usual purple PCBs. But don’t panic: the purple PCB stays. I’m not a monster.)
Building the PCB: Small Components First, Big Thoughts Later
The core of the project was building a PCB small enough to exactly fit the enclosure. And because “exactly” in PCB design is basically a polite way of saying “good luck,” I approached the assembly like this:
- Smallest components first
- Then the ICs
- Then the bulkier surface-mount bits like inductors and capacitors
- Along the way, I made provision for the power LED, the USB-C connector, and the supporting physical layout
It was also a real test of whether my dimensions and component sourcing would cooperate. Tight fit, tight schedule, tight tolerances—aka “the usual fun.”
Does It Actually Work? Spoiler: It Did.
Once the board was assembled, I needed a switch. Then I plugged it in and did a power-on test. I’ll admit I was surprised—in a good way. The voltages (at least as far as the test indicated) behaved properly, and the unit powered an Amiga.
But fitting it into the enclosure introduced its own little puzzle: the board flopped around inside. So I made end caps—crudely at first—by drilling/creating openings for the USB-C, LED, and switch, plus a rudimentary cable relief. That part felt like the difference between “prototype” and “product,” and I love that transition.
Thermals: Lower Than I Expected
For the heat check, I did what any reasonable person would do: used it as an excuse to play Rocraft for about half an hour while monitoring temperatures.
And the numbers pleasantly shocked me. It leveled around 48–49°C, comfortably under 50°C. My expectations were based on watching Rob Smith Dev disassemble a similar commercial-style solution (a Power Shark), where it ran around 75°C under full tilt and somewhere around 50–55°C at normal operating amperage.
Seeing under 50°C while powering an A600 was a strong sign that the thermal design choices were paying off.
Chapter 2: Reality Check at Cambridge (and the Anxiety Teardown)
After that first revision 1 build, the JuiceBox didn’t just sit on my desk. It went on a field trip to the Cambridge Center for Computing History. It spent all day running my Amiga 600 with no issues whatsoever.
Even better (and honestly a little suspicious in the best way): it ran cooler at Cambridge than it did during testing on my bench. That’s the kind of result that makes you realize your bench environment may not represent the real world as lovingly as you think.
It also powered up an Amiga 500 with an attached GVP hard drive. The hard drive had a “blue scuzzy” attached, and that was powered directly from the Amiga so the supply wasn’t doing extra magic beyond what I needed to test.
Then came the comments on the previous video: people suggested I tear it down and check for expanding capacitors or signs of stress.
I personally felt that was unlikely—but I’ve learned that “unlikely” is how you end up learning things the hard way. So, I tore it down anyway. The inside was exactly as it was on the day it went into the case: pristine and functioning perfectly. No visual drama. No capacitor horror-movie soundtrack.
This part is where I felt pleasantly humble: sometimes the engineering holds together better than our worries do.
Comparing the Footprint: Desktop Inconvenience, Edition 1980s
I also took the opportunity to compare the size difference between a Power Shark and my little orange case. In terms of living on a desktop, the gap wasn’t huge—inconvenience-wise—so the upgrade wasn’t just about specs; it was about improving the day-to-day experience of actually living with the thing.
Chapter 3: Revision 2—Tidier Hardware, Better Life
With the real-world test data in hand (and the internals looking healthy), it was time for revision 2. This upgrade wasn’t just cosmetic. It focused on fixing both quality-of-life issues and functional/layout annoyances.
What Changed (and Why It Matters)
Revision 2 addressed:
- Case end caps for the PCB — which made switch mounting and cable management much tidier.
- A rework of the footprint size for capacitors — essentially clearing up spacing constraints so the build process and fit are smoother.
So while I didn’t reinvent the whole concept, I improved the parts that determine whether a project feels “prototype” or “usable.”
Build Process: Same Basics, Faster Flow
The build process remained basically the same, so I sped through it. And, as expected, the “every project has a detour” moment showed up: my initial power-on test with tweezers was a bit more sparky than I anticipated.
For context, thanks to Santa Claus bringing me an ultrasonic cleaner for Christmas, my “toothproof” had a well-deserved rest. (I’m not saying I used it as a tool. I’m saying the project learned new boundaries.)
Final Check: It Ran the Amiga 600
In the end, everything appeared to function perfectly. It ran the Amiga 600 no problem.
I also started experimenting with different screw choices, partly because I’ve learned that small mechanical decisions can have a surprisingly large impact on build satisfaction.
From Prototype to Kits: Teaming Up to Make It Easier
Since the first video, I’d had several people show interest in purchasing a kit. But at that time, nothing was really available, mostly because there were still some “kinks to iron out.” Well—revision 2 is where those kinks got treated like the final boss.
To get kits into people’s hands, I teamed up with Flame Lily. The plan is to offer kits where the PCBs already have all the surface mount components fitted. That means you mainly:
- Put the PCB in the case
- Fit the end caps
- Solder up the switch and cables
- And you’re good to go
Everything you need to know would be in the description, as the project moved from “watch me do the hard part” to “you can build one without wrestling every component yourself.”
My Takeaway: The JuiceBox Wasn’t Just About Power—It Was About Confidence
Looking back, the JuiceBox series felt like a pretty classic engineering journey: start with a working prototype, test it in the real world, second-guess yourself (politely), verify your fears don’t have to win, then refine the stuff that affects everyday usability. The orange case and purple PCB were the visible story—but the real payoff was learning how heat, fit, and build ergonomics behave outside my bench.
And honestly? If your retro project runs cool, fits neatly, and survives a teardown without capacitor drama… that’s basically a victory lap in 3D retro hardware form.

