Alicia Build: Resurrecting an Amiga 1200 into a Mini-ITX “Mac Pro”-Style New Home
I didn’t set out to build “another retro computer.” I set out to resurrect an Amiga 1200 in a different form factor—only to discover, as always, that the past has a way of handing you extra homework. That’s the ethos behind my “Alicia” series: journeying forward into the future while journeying back to remember the past and learn from its lessons. In other words: yes, we’re making something tiny and powerful… but we’re also documenting the dents, the detours, and the surprisingly educational moments along the way.
watch the Alicia build complete—Part 1 here
Chapter 1: Resurrecting the Amiga… into an Alicia
When I started this Alicia project, it really began as a “that’s the beginning” moment. The Amiga 1200 whose chipset would become the heart of this build came from a particularly damaged unit—one where the board was cracked internally and the PCMCIA slot was basically smashed off the board. I didn’t feel great about it, but I did feel hopeful: I verified the chipset was still worth saving by bending the board in the right place to get it to make contact long enough to confirm it was alive.
And here’s the humble-but-important line I always come back to: this project is not for everybody. I wouldn’t advocate destroying a working Amiga 1200. But if it’s your Amiga 1200, that choice is yours—no judgment from me. Retro is messy, and we’re all just trying to keep vintage spirits running on modern sanity.
Unboxing the “mini” surprise
The kit itself is hilariously small in a way that makes you question whether mini-ITX is secretly just a myth. I carefully pulled the OpenM2 board and any stuck-on surface mount components from the packaging, then laid out the parts that included microcontrollers for PS2 functionality. That PS2 upgrade is a quality-of-life improvement I genuinely like—because typing on a vintage machine with a modern keyboard is basically the closest thing to time travel comfort.
The kit also includes connectors for Tornado expansions and, of course, the Alicia motherboard itself. I’ll admit: I was half-expecting purple PCBs—the universe loves an aesthetic surprise—but the video is honest enough to say that some people looking for purple may be slightly disappointed. (For me? I’d still like to see what it would look like in purple someday. We’re retro, not mind-readers.)
Soldering: tuning the iron like it’s a synth
I started with the smaller surface mount components because they’re relatively straightforward, and because fitting them first gives me time to dial in soldering temperatures. I pay attention to how heat moves—how the ground plane soaks it away—because surface mount soldering isn’t just “apply solder.” It’s “apply solder without summoning shorts.”
Next up were the CPU and some ICs with fine-pitch flat pins, which are drag-solder friendly—but alignment is always the hard part. Once the alignment is right, it’s mostly technique and not panicking. Then came the RAM, which I consider the most painful part. I’d had difficulty assembling the SIM for Denise with the same chips, so my confidence wasn’t exactly high. Still, I got all the chip RAM fitted.
Custom chips (and the PLCC pin ballet)
One of the biggest learning curves in this build was handling the Amiga 1200’s custom chips that are meant to go into PLCC packages—except on the original 1200 they were soldered to the board. Following the guidance of “Mr. A,” I attached them to the Alicia in that soldered style.
PLCC soldering is slightly different because the pin is underneath—so it’s harder to see what you’re doing from above. My approach was to heat the pin and pad with solder and flux: add flux, add solder to the iron tip, then place the iron so it contacts the pad and pin simultaneously. When it’s at the right temperature, the solder forms a ball and then “drips” down under and onto the pad before solidifying. After that, I drag solder across the bottom to remove excess.
Most important of all: check for shorts. Because PLCC packages can end up shorted “just around the curve,” and shorts are sneaky little gremlins that often hide where your eyes can’t.
First power-on… and then: the keyboard doesn’t work
After the custom chips were on, the build moved to through-hole components and connectors. Then I ran initial short checks. During testing I found quite a few shorts—then corrected them. My capture device was also giving me some issues, so I had to be careful about what was “real hardware” versus “what the recording pipeline ate.”
Then came the power-on moment: Alicia connected up to a Dell monitor, power applied, and… it looked good enough for me to breathe again. The output seemed fine.
But during further testing (and yes, my iPhone chose to destroy the footage for “no apparent reason”), I found the keyboard wasn’t working. I tried four different PS2 keyboards, which I mention not to brag, but to show the logic: this wasn’t a keyboard being stubborn—it was something in the Alicia/PS2 input path.
Troubleshooting by deduction
I traced where PS2 inputs go and how that data reaches the CIA in a format the Amiga can understand. I started with the CIA itself: no activity on the data or clock for the keyboard.
Tracing backward, it led to one of the controllers handling reset and translating input to the Amiga. During probing on reset, I could see the clock running—but the data line staying low. That was odd. In a proper reset sequence, you’d expect the clock to momentarily go low and the data line to go high for at least 100 milliseconds, signaling the keyboard that the system is ready to communicate.
In my observations, that reset sequence wasn’t happening at all.
Logically, I considered two likely causes: either the microcontroller wasn’t providing reset—or the reset wasn’t getting through to the CIA. But since the mouse worked perfectly (and I assumed it used the same controller logic path), I focused on what I could see electrically at the reset-related pin conditions.
Then I found the real culprit: the PS2 data pin had a dead short to ground. Resistance gradually changed as I probed closer to the connector, which suggested the short was physically near the PS2 area.
The “I bumped it” fix
The most logical course was to remove the PS2 connector (which also meant removing the VGA connector because of the combined connector complexity). To my surprise, one of the ground mounting pins was bent and just long enough to reach the pad on the data pin—effectively shorting it to ground.
While doing the repair, I also realized something embarrassing: I’d fitted the Tornado 2 connector the wrong way round. I was convinced it couldn’t be installed incorrectly because it “only fits one way”… except my hands apparently don’t respect connector keying as much as my brain does. I even chipped the very edge of the PCB in the process and found two traces running along the edge that were broken.
So yes—I repaired those traces and covered them in solder mask. Unfortunately the solder mask was green (because of course it was). I’ll take “functional” over “perfect color accuracy,” but I did add a mental note: maybe I should order some blue. For the aesthetic. For the therapy. For the next time I pretend I’m not human.
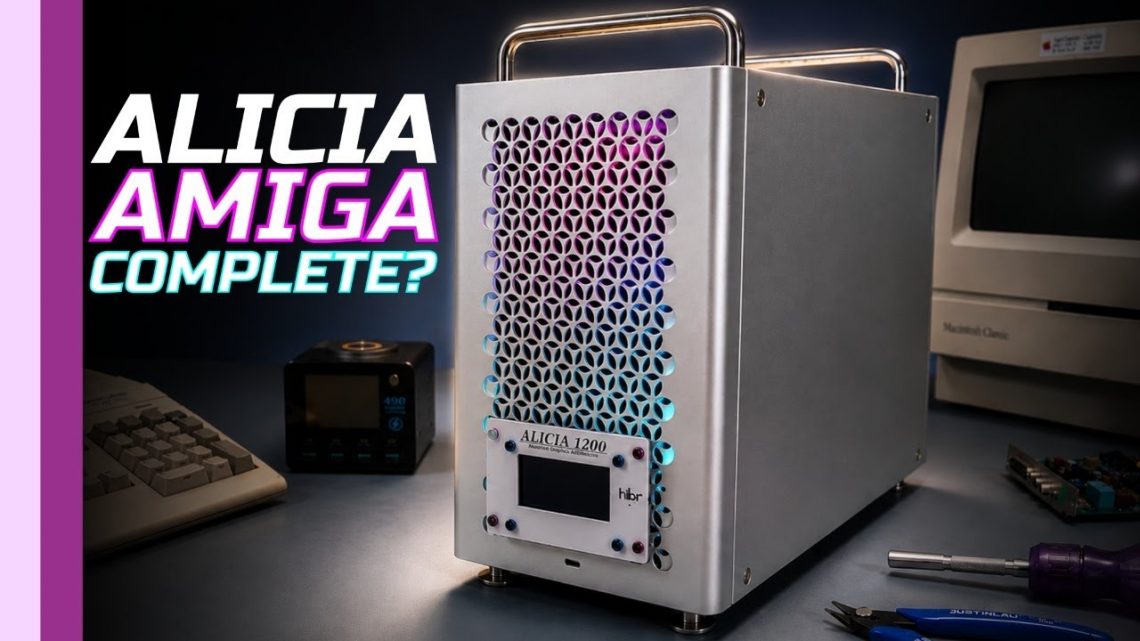
Into the case: Mac Pro vibes, retro soul intact
After that, I focused on the ROM planning (starting with 3.1 and then switching to 3.2 for what I planned to run going forward). At the time, the system was basically a stock Amiga 1200 with no floppy drive and no hard drive—just enough to mount into the case and make sure everything stayed stable.
And the case? It was a Mac Pro-esque “copy type case,” very similar theme to the Denise case—more Mac Pro this time. It’s one of the smallest I could find that takes a full-size ATX power supply, which means plenty of amps for future expansions and accelerators. There’s also space I believed we could use later—something I flagged as “another video” territory.
Most importantly: it fired up perfectly. And that’s how we earned the right to move from “it boots” to “it looks the part.”
Chapter 2: Making Alicia look the part (and solving the “no floppy space” problem)
Once I had Alicia built into the case and running, the mission shifted: finishing the build to something closer to what you’d expect from Hack Build Restore. That meant making it functional in the ways that matter day-to-day, not just “technically alive.”
To see where I went next—how I brought the GoTek-style solution into the case and made sure it felt right—I continued the story in Amiga Modification Complete here.
A “not a modern Mac Pro” moment
I leaned into the truth: “This is not a modern Mac Pro. It’s an Amiga.” Specifically, an Amiga 1200: the Alicia. In the earlier video, the machine was only briefly seen—enough to confirm the build—but now the goal was finishing details that affect the experience.
GoTek without the floppy footprint
The case I used has no space for a traditional floppy drive, so I spent time figuring out how to bring a GoTek solution into the build while keeping the aesthetic pleasing. What I came up with might not fit everyone’s taste, but it worked for me.
I sourced very large OLED displays, aiming for compatibility with the GoTek setup. Then I started attaching headers, wiring it up, and testing whether anything useful showed on screen. This is the part where retro projects either become “delightfully functional” or “why did I do this to myself” journeys—and I’m glad the former won.
Designing the control interface
After initial tests, I moved to the mechanical and interface layer. I designed a PCB that incorporates a rotary encoder—placed on the side rather than sticking out the front. The intention was to make it feel elegant, like something you’d find on portable 90s game consoles. Retro nostalgia: aesthetic, but with purpose.
During assembly, I also had a moment of reality: everything was bolted up and turned the right way… except, somehow, the wires were the wrong way around because “up is down and down is up,” at least from my perspective at that time. Classic.
Making it “fit” and feel intentional
To correct the hardware integration, I needed to cut small holes in the mesh so I could poke cables and screws through. This was one of those “measure twice, regret once” steps—except regret was optional, because I got it working.
Then I added LEDs. I didn’t put “normal LEDs” in just anywhere, though: I relocated round LEDs to the front so they shine through the grill, making the whole case light up in a way that matches the Mac Pro-esque vibe. The machine wasn’t just functional—it was visible. Retro computers deserve stage lighting.
Closing the back: the missing-plane problem
The second big issue was the huge gaping hole in the back. That’s not ideal, even in retro land, where we tolerate dust because it’s “character.” I created a custom PCB in KiCad to provide the back I/O plane.
I’d done something similar on my Denise build, so I had a reference point. With this new rear plane designed, the last step was making sure it physically fit, which is the always-fun final check: if the design worked in KiCad but not in the real world, it’s not KiCad that’s wrong—it’s your assumptions.
And with that, Alicia was ready to look right and behave right.
Takeaway: retro isn’t nostalgia—it’s iteration
What I love about the Alicia series is that it isn’t just “build a computer.” It’s a journey through the realities of repairing, rebuilding, soldering, debugging, and then polishing the user experience until it feels like a proper machine—not a science project in a trench coat.
And if I learned anything here, it’s this: future-facing retro builds are powered by two things—patience and your willingness to admit when a bent pin, a misoriented connector, or a short is on you. The past gives us the hardware. We give it the second life.

